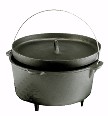
No single cooking apparatus is more versatile and invaluable to the primitive camp than the Dutch oven. This article is written specifically for those who have never experienced the joys and facility of this wonderful invention. If you have baked bread or a nice roast in one, you certainly don’t need evangelizing.
The Dutch oven was invented several hundred years ago and has undergone several subtle improvements. But it is essentially the same concept. A flat bottomed cast iron pot with legs to keep it an inch or two from the ground, fitted with a cast iron lid with a lip around the edge. The oven is placed atop a bed of coals, food is placed inside, and coals are placed on top of the lid – the lip preventing the coals from falling off. This provides a high-temperature, even heat, just like your home oven. In fact, anything you can cook in your home fancy gas/electric conventional oven can be prepared in a Dutch oven outdoors, right on the ground!
Where do we start? Buy one, or two, or even three. They come in a variety of sizes. Your best all-around size is a 12” diameter 6 quart oven. This will be your workhorse oven. If friends come a’ callin’ or you have a large camp, try a 14” 10 quart or a 16” 12 quart. These will roast small to medium sized turkeys, bake up huge batches of bread, or enough beans to feed 50 people. And don’t forget a smaller oven as well, maybe an 10” 4 quart, perfect for a big meal for two. Lodge is the venerable old manufacturer and is considered the best by many, although you can find many aftermarket ovens everywhere. There’s even an aluminum oven that backpacks light and allows you to bake hot bread – an unprecedented treat for deep-woods trekkers. Some other useful items to have on hand are leather gloves, a pot lid lifter, a small shovel, a chimney-style charcoal lighter, and a whisk broom for brushing ash off the lid (to keep your food clean when you open the oven!)
Season your oven before use. Clean the iron thoroughly using hot salt water, to remove any wax or manufacturing residues. Then smear on a generous coating of vegetable oil and pop it into a 400 degree oven for about 20 minutes. This will seal the porous cast iron, prevent rust and make cleanup a lot easier. Thereafter, don’t use soap to clean your ovens. Use salty water and rinse/dry well. Over time you may have to re-season your oven to keep it in good shape.
Cook something! As I said, anything you can cook in a conventional oven comes out great in a Dutch oven. First, prepare your coals. You can build a fire and use wood coals but their heat is not as even and long-lasting as plain old charcoal briquettes.
The number and placement of the coals on and under your oven is the key. The optimal number of coals used for any oven is based on its diameter. Figure 2 coals per inch of oven diameter. Place 2 more coals than the oven size on the lid, and 2 less than the oven size under it. Example: For a 12-inch oven, 12-2=10 coals under the oven, and 12+2=14 coals go on the lid, for a total of 24. More than this and you will burn your food, less than this and the temp might not be enough.
If it’s very cold outside, place a layer of aluminum foil on the ground, then the charcoal, then the oven – this will make sure the ground doesn’t suck the heat out or dampen your coals.
Stack ‘em up! If you buy several different sized ovens you can cook everything at once and optimize your heat. Perhaps a beef roast with vegetables in the largest oven, with a casserole or beans on the next smaller size, and some hot rolls or a yummy baked dessert on top! The pyramid of ovens will impress your guests just to look at. And when you pop those lids open and the wonderful home-baked aroma drifts around the camp, you’ll have adoring fans forever!
I’ll share some of my favorite recipes if there’s interest. Just follow this blog thread or send me e-mail at: cecilnixxon@sbcglobal.net
Happy cooking!


No comments:
Post a Comment