Sunday, July 09, 2006

PET Projects

A universal rule in backpacking is, "always try to get two or more uses out of a single item." The value is obvious, more so when you're calculating weight down to the gram. A good, additional rule might be, "...and use something again after it is discarded." This plays right in to an all-around low impact presence both in town and in the wilderness. I've been talking about ho-made camping gear more than a bit... not just because it is cheap, but it is an adaptation behavior we might need some day when, as the hippies used to say, "the shit comes down." Here are some thoughts regarding the king of recyclable plastic, Polyethylene Terephthalate (PET).

PET is one of the oldest of the recyclable plastics, dating back to the 1940's. Unlike most plastics, it lends itself to recycling. According to the EPA, recycling a pound of PET saves approximately 12,000 BTU’s of energy consumption. And since PET is totally recyclable and the basis for many synthetic fibers, here's what it can yield:
  • Fourteen 20 oz. PET bottles yield enough fiber for an extra large T-shirt.
  • Fourteen 20 oz. PET bottles make one square foot of carpet.
  • Sixty-three 20 oz. PET bottles make a sweater.
  • Fourteen 20 oz. PET bottles yield enough fiberfill for a ski jacket.
  • Eighty-five 20 oz. PET bottles make enough fiberfill for one sleeping bag.

PET is also extremely lightweight in relation to its strength. Consider the ubiquitous 1 and 2 liter soft drink bottles. Strong, featherweight, the ideal container to fill with liquids and toss into the backpack. And it can die and be resurrected several times during the trek, and even then the remains can be returned to civilization where they go right back into the system. So, here are four uses for a two-liter bottle:

  1. Bring your bottle into the wilderness full of water or your favorite beverage. Consume!
  2. Cut the bottle three inches from the bottom, and use the bottom for a cereal or mixing bowl.
  3. Cut the bottle four inches from the top. Remove the cap and nest a coffee filter into the funnel-shaped top. Use this to pre-filter ground water before treatment.
  4. Use the remaining six inch ring of plastic as a ground lantern. Put a candle on the ground and set the ring around it to keep the wind out.


Some other musings on the trail use of PET:
  • A plastic bottle also makes a good latrine for cold weather camping. (You don't have to 'go' very far from your sleeping bag). Keep it just out side the tent flap.
  • Use a bottle as a large float for fishing. Tie a nylon line on the rim of the jug, long enough to throw the jug out at least ten feet. Tie the other end to a limb on the bank. Put a stage of fishing line, a hook and sinker onto the rim of the jug and bait it. Toss the baited jug out like a giant bobber.


So, what's your PET project?

Tuesday, June 20, 2006

Thinking Inside of the Box

Cardboard Box Oven


A cardboard box will make an oven -- and it works just as well as your oven at home! There are different ways to make a cardboard box oven. The two described here are the most common, but you can dream up your own design. Good boxes for ovens include:

  • Brewery long neck beer returnable box (the best – heavy duty with a lid)
  • Whiskey or wine case boxes
  • Copy paper boxes

The principle is simple: Line a cardboard box inside and outside completely with heavy duty aluminum foil. Provide some means of keeping the food away from the coals. Use charcoal briquettes to control the temperature. A properly made cardboard box oven will last for many uses, costs practically nothing, and recycles a cardboard box. Not only that, it will bake things outdoors you thought could only be made indoors!

Style #1: The Open Top Box Oven

Cut off the flaps so that the box has four straight sides and bottom. The bottom of the box will be the top of the oven. Cover the box inside completely with foil, placing the shiny side out (hint: use Elmer’s glue to stick the foil to the box)

To use the oven, place the pan with food to be baked on a footed grill over the lit charcoal briquets. The grill should be raised about ten inches above the charcoal. In the picture below, soft drink cans raise the baking pan above the coals. Set the cardboard oven over the food and charcoal. Prop up one end of the oven with a pebble to provide the air charcoal needs to burn - or cut air vents along the lower edge of the oven.


Figure 1 - Simple open-top oven

Style #2: The Copy Paper Box Oven

The cardboard boxes that hold reams of paper, 10 reams of 8 1/2 by 11 inch paper, or 10 reams of 8 1/2 by 14 inch paper, will make very nice box ovens. Line the inside of the box and lid with aluminum foil. Use a sponge to dab some Elmer's glue around the inside and cover to hold the foil in place. Make a couple holes in the cover to let the combustion gases out, and make a few holes around the sides near the bottom, to let oxygen in.

Make a tray to hold the charcoal using one or two metal pie plates. You can either make feet for a single pie plate using nuts and bolts, or bolt two pie plates together bottom to bottom. Cut a couple coat hangers to make a rack to hold up the cooking pan. Poke the straight pieces of coat hanger through once side, and into the other.


Figure 2 - Box showing coat hanger wire rack

Put several lit briquettes on the pie pan, put your cooking pan on the rack, and place the cover on top. The first time you use this box oven, check it a few times to make sure that enough oxygen is getting in, and enough gases are escaping, to keep the charcoal burning. A nice enhancement would be adjustable vents on the bottom and lid to control the burn. Brass brads and disposable aluminum pie plate are some possible draft door materials.

Box Oven Tips

  • Control the baking temperature of the oven by the number of charcoal briquettes used. Each briquette supplies 40 degrees of heat (a 360 degree temperature will take 9 briquettes).
  • Experiment! Build an oven to fit your pans - or your menu: Bake bread, brownies, roast chicken, pizza or a coffee cake.
  • Construct a removable oven top or oven door. Punch holes on opposite sides of the oven and run coat hanger wire through to make a grill to hold baking pans.
    Try the oven over the coals of a campfire.
Field Trials

The C3 Psychoto-electro Arkestra encampment at the Peace Conspiracy Festival in June 2006 featured demonstrations of this apparatus. The copy paper box model was built and used. A slight field modification had to be made to allow enough air for comubstion. A slit door 1" by 2" was cut in the side of the box a couple of inches from the bottom. This allowed the oven to burn perfectly with the lid snugly on.

Few festival-goers had heard of such a thing (although they are all veteran hippie campers!) and quite a bit of interest was generated. Of course, having some good things to eat did not hurt at all. Here's what was prepared:
  • White bread - the box accommodated three standard loaf pans side by side, making for an efficient use of 9 briquettes to bake 3 loaves. Grocery store frozen dough was used.
  • Biscuits - regular canned biscuits cooked up wonderfully, crispy and brown on the outside, yummy soft on the inside.
  • Dump Cake - by substituting lemon/lime soda for water or milk in a cheap box cake mix, then adding goodies like nuts, dried fruit or cherry pie filling, delicious cakes!

Tuesday, February 21, 2006

Star Performance

About 20 years ago I had the opportunity of backpacking with an old scouter and learning something big. This was before my reintroduction to Scouting, which coincided with my introduction to fatherhood - another story about learning big things.

I was pretty sure of myself in the woods and invited him to my favorite Missouri deep-woods wilderness. Although I knew he was an outdoorsman, hunter and scouter his gear and packing approach didn't fit my modern backpacker gearhead attitude I had created for myself. He had a decent pack and sleeping bag, but other than a few bare necessities and a plastic tarp, he brought along a bow saw and two coffee cans nested inside of a #10 can. He kept saying he had plenty of gear, as if he sensed my uneasiness about his spartan equipment.

With the bow saw he made quick work at the evening campsite. Using downed wood he produced a number of three foot long construction components made of around four inch diameter logs with a fork or "Y" at one end. He interlocked the "Y"s at the top and made tripods (called them "frogs") on which he laid rails and in no time we had benches and tables. Using this approach he built a frame for his 4 mil. poly tarp tent and a frame for his pack. The technique was startling in its simplicity.

He then made two star fires using four logs about six inches in diameter and a couple of feet long, and one log about three feet long. He placed the longest log facing at an angle to the wind, and the rest of the logs in a star arrangement with their ends together. In the hub between all of the logs he piled tinder and fired it up. He put the #10 can full of water right on top of the fire. I saw those star fires bring gallon after gallon of water to a boil in a few minutes and keep them at a moderately rolling boil all night. He occasionally kicked the ends of the logs into the hubs as they were consumed to keep the fires burning.


An eleven foot log, six inches in diameter produced the water boiling capability of easily five times that much wood in a conventional ground fire, or several gallons of stove fuel. When we went to bed we just took the pots off and pulled the logs away from themselves and the fire went right out. Next morning they were re-lit in no time. The environmental impact was extremely low, too. When we broke camp we only had to deal with about a twelve inch diameter pile of clean ashes which pretty much washed away when we doused the fire.

All of this new basic tech humbled my gear-weenie ass and I've used it ever since. Outdoor living always involves boiling water for purification and cooking. The star fire is very efficient at this. It even continues to boil water in the rain, since the fire is completely covered by the pot! All it takes is a bow saw to cut up the fuel and a pot to sit on top. The simple lash-less "frog" pioneering construction approach solves all kinds of structural and camp furniture issues, too.

He kept saying he had plenty of gear. He did.

Sunday, February 05, 2006

Dutch Treat


No single cooking apparatus is more versatile and invaluable to the primitive camp than the Dutch oven. This article is written specifically for those who have never experienced the joys and facility of this wonderful invention. If you have baked bread or a nice roast in one, you certainly don’t need evangelizing.

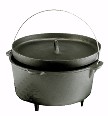
The Dutch oven was invented several hundred years ago and has undergone several subtle improvements. But it is essentially the same concept. A flat bottomed cast iron pot with legs to keep it an inch or two from the ground, fitted with a cast iron lid with a lip around the edge. The oven is placed atop a bed of coals, food is placed inside, and coals are placed on top of the lid – the lip preventing the coals from falling off. This provides a high-temperature, even heat, just like your home oven. In fact, anything you can cook in your home fancy gas/electric conventional oven can be prepared in a Dutch oven outdoors, right on the ground!

Where do we start? Buy one, or two, or even three. They come in a variety of sizes. Your best all-around size is a 12” diameter 6 quart oven. This will be your workhorse oven. If friends come a’ callin’ or you have a large camp, try a 14” 10 quart or a 16” 12 quart. These will roast small to medium sized turkeys, bake up huge batches of bread, or enough beans to feed 50 people. And don’t forget a smaller oven as well, maybe an 10” 4 quart, perfect for a big meal for two. Lodge is the venerable old manufacturer and is considered the best by many, although you can find many aftermarket ovens everywhere. There’s even an aluminum oven that backpacks light and allows you to bake hot bread – an unprecedented treat for deep-woods trekkers. Some other useful items to have on hand are leather gloves, a pot lid lifter, a small shovel, a chimney-style charcoal lighter, and a whisk broom for brushing ash off the lid (to keep your food clean when you open the oven!)

Season your oven before use. Clean the iron thoroughly using hot salt water, to remove any wax or manufacturing residues. Then smear on a generous coating of vegetable oil and pop it into a 400 degree oven for about 20 minutes. This will seal the porous cast iron, prevent rust and make cleanup a lot easier. Thereafter, don’t use soap to clean your ovens. Use salty water and rinse/dry well. Over time you may have to re-season your oven to keep it in good shape.

Cook something! As I said, anything you can cook in a conventional oven comes out great in a Dutch oven. First, prepare your coals. You can build a fire and use wood coals but their heat is not as even and long-lasting as plain old charcoal briquettes.

The number and placement of the coals on and under your oven is the key. The optimal number of coals used for any oven is based on its diameter. Figure 2 coals per inch of oven diameter. Place 2 more coals than the oven size on the lid, and 2 less than the oven size under it. Example: For a 12-inch oven, 12-2=10 coals under the oven, and 12+2=14 coals go on the lid, for a total of 24. More than this and you will burn your food, less than this and the temp might not be enough.

If it’s very cold outside, place a layer of aluminum foil on the ground, then the charcoal, then the oven – this will make sure the ground doesn’t suck the heat out or dampen your coals.

Stack ‘em up! If you buy several different sized ovens you can cook everything at once and optimize your heat. Perhaps a beef roast with vegetables in the largest oven, with a casserole or beans on the next smaller size, and some hot rolls or a yummy baked dessert on top! The pyramid of ovens will impress your guests just to look at. And when you pop those lids open and the wonderful home-baked aroma drifts around the camp, you’ll have adoring fans forever!

I’ll share some of my favorite recipes if there’s interest. Just follow this blog thread or send me e-mail at: cecilnixxon@sbcglobal.net

Happy cooking!